Senior recommendations and advice
The predicted breakup for the board questions:
Application procedure
OneNote
Best of luck.
P.s.- I passed the boards! Yay. I am now a Board Certified Pediatrician.
The predicted breakup for the board questions:
- Between 60-70% MCQs are from concepts asked in the previous years
- Between 20-25% MCQs are questions asking a more difficult concept but from the same topics from previous years
- About 5-20% of the questions are newer topics/very difficult or impossible questions
Application procedure
- Opens in January or somewhere over there and it is administered over 3 day period in mid-October
- Prior to sitting and writing it you will NEED a PERMANENT license to take the boards. My sincere advice is to start applying for it early. However, it also depends on where you are practicing/doing the fellowship. Since some states like MA, do not allow a permanent license for IMG's unless you have completed a residency (3 years of training in the States)
- Do note- You can register for exam w/o license but need proof of it prior to writing the boards
- Once registered for the exam they will send you an email maybe 2-3 weeks later telling you can schedule your exam. I took my test on Day 2.
Documents needed for above
By early July
By early July
- Copy of your medical school diploma + English translation, if necessary
- Copy of ECFMG Certificate or documentation of successful completion of the MCCEE or Fifth Pathway/FMGEMS
By October 1st of the year you are writing
- Copy of your valid (current), unrestricted medical license
- The copy of the lice must include the expiration date and must be issued before October 1st
- Please note that temporary or training licenses are NOT acceptable
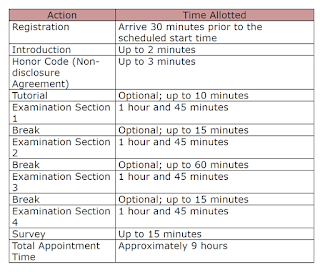
The exam itself
- Approximately 335 questions divided across 4 sections, with each section having roughly equivalent content, difficulty, and length
- 4 sections, 84 questions per section, 1 hour 45 minutes/section
- Most of us finished at least 2 sections with about a half 20-30 min to spare
- 3 Breaks: OPTIONAL
- 15 min, 60 min, 15 min
- Passing score: weighted score of 180, ~75% questions correct.
- Each exam is different, and some exams are “harder” than others, but are weighted accordingly to give you a scaled score from 0-300

Things that I used for the preparation are as follows
My first year ITE was pretty good. I attribute that to my Step 3 knowledge. However, my 2nd year ITE was not great. Started reading from the Medstudy books system wise and doing questions, system-wise (the video shows how to do it). I even bought the medstudy flash cards. My 3rd year ITE was good and I just kept at what I was doing till then. Towards the end of 3rd year, kept glancing through 'Laughing your way through the Boards'. Recommended by my seniors and attending. Loved it
My first year ITE was pretty good. I attribute that to my Step 3 knowledge. However, my 2nd year ITE was not great. Started reading from the Medstudy books system wise and doing questions, system-wise (the video shows how to do it). I even bought the medstudy flash cards. My 3rd year ITE was good and I just kept at what I was doing till then. Towards the end of 3rd year, kept glancing through 'Laughing your way through the Boards'. Recommended by my seniors and attending. Loved it
PediaLink
The following video has tips that I used for studying.
Medstudy
The following video has tips that I used for studying from Medstudy
The following video has tips that I used for studying from Medstudy
OneNote
Best of luck.
P.s.- I passed the boards! Yay. I am now a Board Certified Pediatrician.